
Development guide: Scheduling audio
You might want to control playback of sounds in response to user interactions. The interactions may come in the form of button presses, scheduled events or midi commands that require the audio application to respond accordingly.
For the purpose of this guide, we'll be responding to button presses, playing four different notes through a Superpowered Generator. This will keep the guide concise and clear, demonstrating how you might respond responsively to user interactions. We'll be creating a monophonic sine tone synth. From here, you could take the concepts and extend the source of the events from the example buttons to a scheduled timeline or midi events.
Setting up the audio graph
Let's create the audio graph first.
Within a Superpowered AudioWorkletProcessor, do the following within the onReady function:
...onReady() {this.generator = new this.Superpowered.Generator(this.samplerate,this.Superpowered.Generator.Sine);// Pre-allocate a buffer for processing inside processAudio.// Allocating 1024 floats is safe, the buffer size is only 128 in most cases.this.monoBuffer = new this.Superpowered.Float32Buffer(4096);this.genVolume = 0;this.genPreviousVolume = 0;// Notify the main scope that we're prepared.this.sendMessageToMainScope({ event: "ready" });}...
We'll generate audio into this.monoBuffer, then apply a short but gradual volume change with the this.genVolume and this.genPreviousVolume variables. this.genVolume will be set via messages from the main thread a little later on.
Modify the AudioWorkletProcessor's processAudio method and follow the comments provided for details:
...processAudio(inputBuffer, outputBuffer, buffersize, parameters) {// Ensure the samplerate is in sync on every audio processing callback.this.generator.samplerate = this.samplerate;// Generate the tone (full volume).this.generator.generate(this.monoBuffer.pointer,buffersize);// Copy the mono buffer into interleaved stereo buffer.this.Superpowered.Interleave(this.monoBuffer.pointer, // left sidethis.monoBuffer.pointer, // right sideoutputBuffer.pointer,buffersize);// Apply volume. genPreviousVolume is the start of the volume ramp, and genVolume is the destination of the ramp.// The ramp takes place over the length of the buffer (buffersize).this.Superpowered.Volume(outputBuffer.pointer,outputBuffer.pointer,this.genPreviousVolume,this.genVolume,buffersize);// Save the latest volume value which is used in the next process loop call.this.genPreviousVolume = this.genVolume;}...
Within our viewDidLoad function in the main controller, we create a Superpowered Generator instance and two associated variables that will hold the current and next gain value.
@implementation ViewController {SuperpoweredOSXAudioIO *audioIO;Superpowered::Generator *generator;float genVolume, genPreviousVolume;}- (void)viewDidLoad {[super viewDidLoad];Superpowered::Initialize("ExampleLicenseKey-WillExpire-OnNextUpdate");NSLog(@"Superpowered version: %u", Superpowered::Version());generator = new Superpowered::Generator(48000, Superpowered::Generator::Sine);genVolume = 0;genPreviousVolume = 0;[self bindButtonActions];audioIO = [[SuperpoweredOSXAudioIO alloc] initWithDelegate:(id<SuperpoweredOSXAudioIODelegate>)self preferredBufferSizeMs:12 numberOfChannels:2 enableInput:true enableOutput:true];[audioIO start];}
You may notice that we called bindButtonActions just before we start the Superpowered audio processing callback. We'll cover this later.
Creating the UI
We'll simply add four HTML buttons to the screen:
<div id="shonkyPiano"><buttonclass="pianoKey"onmousedown="startNote(220)"onmouseup="stopNote()">A</button><buttonclass="pianoKey"onmousedown="startNote(246.94)"onmouseup="stopNote()">B</button><buttonclass="pianoKey"onmousedown="startNote(261.63)"onmouseup="stopNote()">C</button><buttonclass="pianoKey"onmousedown="startNote(293.66)"onmouseup="stopNote()">D</button></div>
The frequencies represent four consecutive white keys on the piano.
Please note the functions we are binding to the mouseup and mousedown events in the main scope. The argument we are providing to startNote will determine the frequency of the tone the generator will generate.
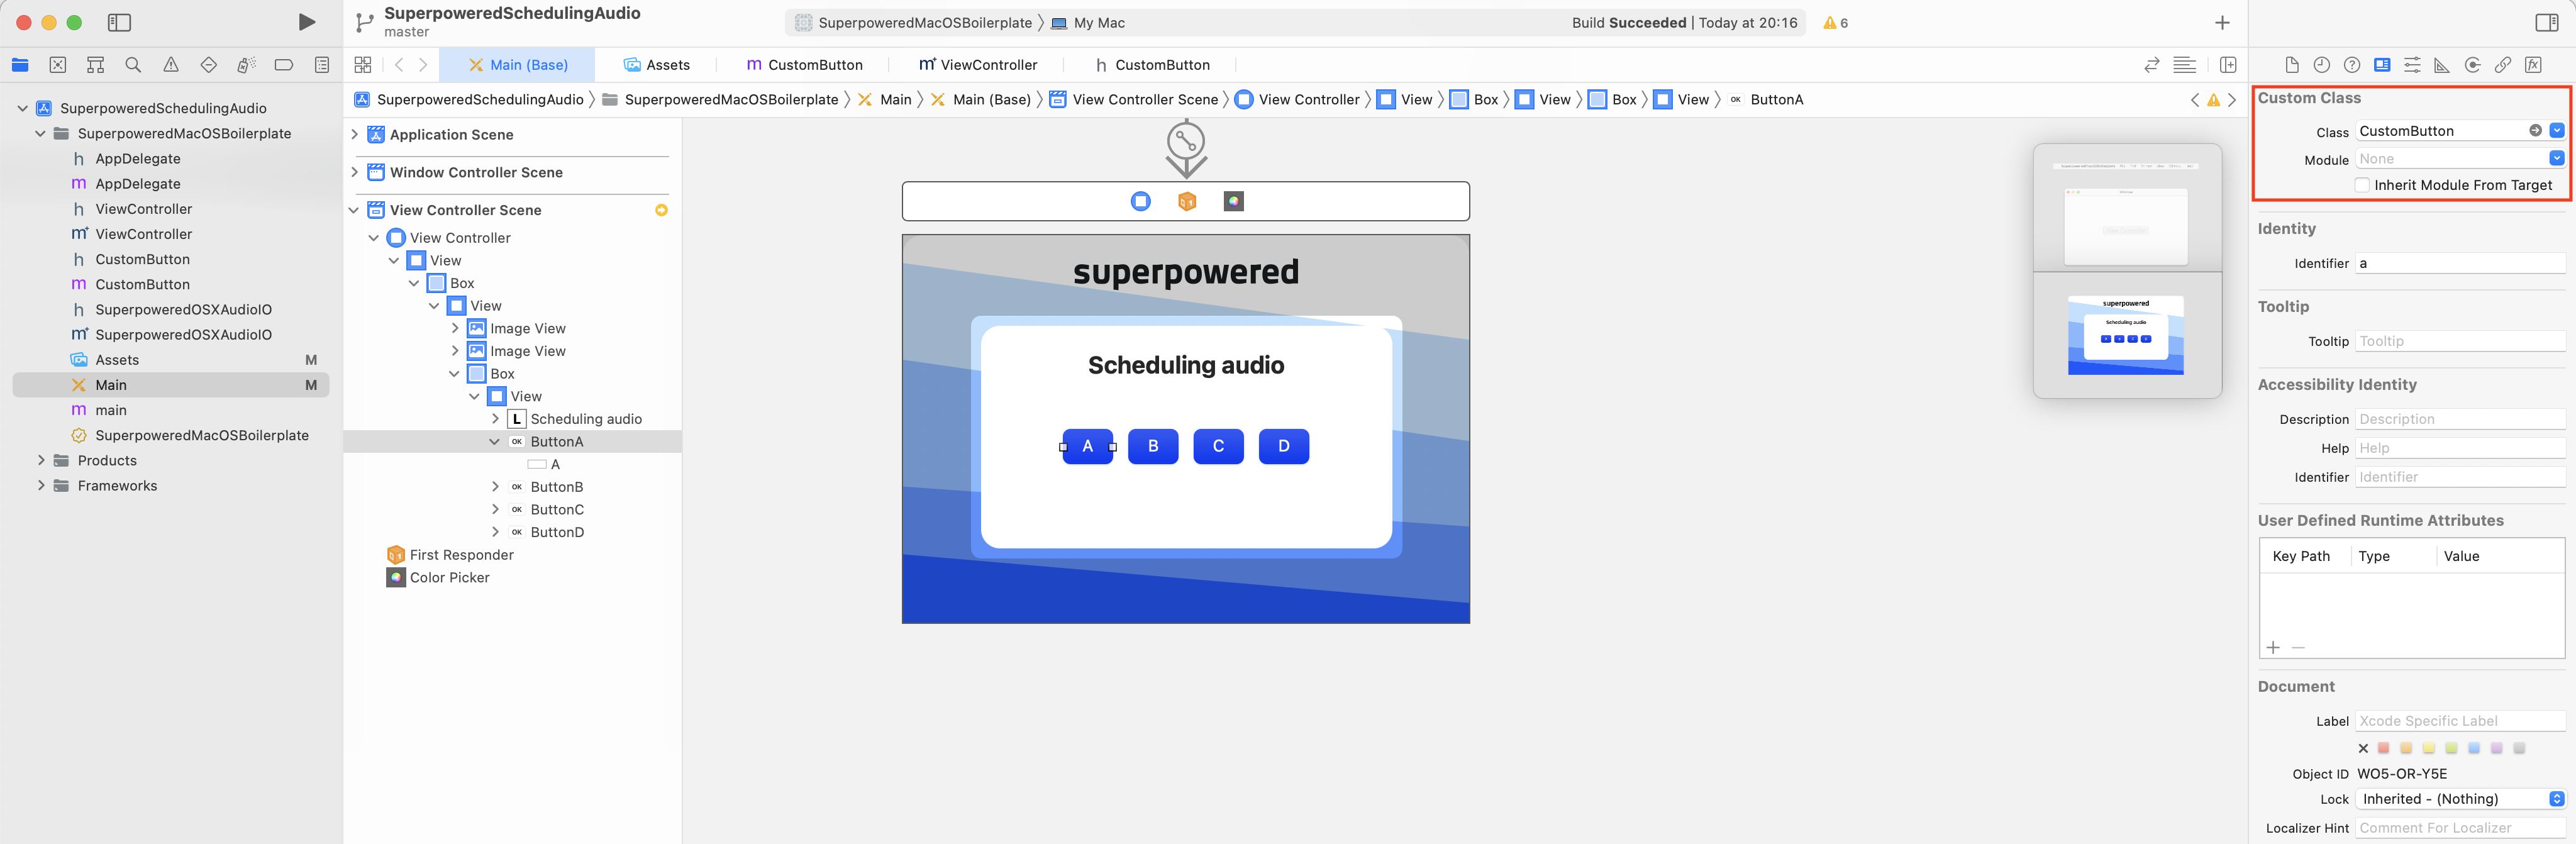
Let's place some buttons in Xcode's interface builder, which we'll use to trigger notes on the mouseUp and mouseDown events.
Unfortunately, the mouse up and mousedown events are not normally exposed on the built-in button classes, so we'll need to create a subclass of our own. This is outside of the scope of the guide as it's specific to Objective-C, so please check CustomButton.h and CustomButton.m if you'd like to see how this was achieved. For the purposes of the guide, we'll just need to make sure we attach our CustomButton subclass to our buttons in interface builder.
Also, make sure you are importing the custom class in the view controller:
#import "ViewController.h"#import "Superpowered.h"#import "SuperpoweredSimple.h"#import "SuperpoweredOSXAudioIO.h"#import "SuperpoweredGenerator.h"#import "CustomButton.h"...
Next, we must bind the buttons as properties at the top of the view controller by CTRL dragging each button across to the controller and name them as follows:
@interface ViewController ()@property (weak) IBOutlet CustomButton *buttonA;@property (weak) IBOutlet CustomButton *buttonB;@property (weak) IBOutlet CustomButton *buttonC;@property (weak) IBOutlet CustomButton *buttonD;@end
Sending events
As you can see above, we are triggering startNote directly from the DOM, so let's see what that looks like in our main application class.
We can see that we are pushing noteOn and noteOff events into the audio thread via the AudioWorkletProcessor message port, passing in the parameters we need to play a note at half volume.
...startNote(freq) {this.generatorProcessorNode.sendMessageToAudioScope({type: "command",payload: {id: "noteOn",velocity: 0.5,frequency: freq}});}stopNote() {this.generatorProcessorNode.sendMessageToAudioScope({type: "command",payload: {id: "noteOff",velocity: 0}});}...
Remember that we can send any message payload over the message port from the main scope to the audio scope, but it needs to be fully serializable.
Within our AudioWorkletProcessor script, we parse the inbound messages sent via sendMessageToAudioScope with the onMessageFromMainScope method:
...onMessageFromMainScope(message) {if (message.type === "command") {if (message.payload?.id === "noteOn") {this.generator.frequency = message.payload.frequency;this.genVolume = message.payload.velocity;} else if (message.payload?.id === "noteOff") this.genVolume = message.payload.velocity;}}...
We are directly setting the frequency value of the generator, but also the next intended volume which gets picked up and applied in the processAudio loop. Inside the audio processing callback, we then store the latest volume value received as so we can apply a smooth curve with the Volume function.
processAudio(inputBuffer, outputBuffer, buffersize, parameters) {// Ensure the samplerate is in sync on every audio processing callback.this.generator.samplerate = this.samplerate;// Generate the tone (full volume).this.generator.generate(this.monoBuffer.pointer,buffersize);// Copy the mono buffer into interleaved stereo buffer.this.Superpowered.Interleave(this.monoBuffer.pointer, // left sidethis.monoBuffer.pointer, // right sideoutputBuffer.pointer,buffersize);// Apply volume. genPreviousVolume is the start of the volume ramp, and genVolume is the destination of the ramp.// The ramp takes place over the length of the buffer (buffersize).this.Superpowered.Volume(outputBuffer.pointer,outputBuffer.pointer,this.genPreviousVolume,this.genVolume,buffersize);// Save the latest volume value which is used in the next process loop call.this.genPreviousVolume = this.genVolume;}
Remember earlier that we called bindButtonActions just before we start the audio processing callback. Let's define that function now:
...- (void)bindButtonActions {self.buttonA.mouseDownBlock = ^{[self playNote:220];};self.buttonB.mouseDownBlock = ^{[self playNote:246.94];};self.buttonC.mouseDownBlock = ^{[self playNote:261.63];};self.buttonD.mouseDownBlock = ^{[self playNote:293.66];};self.buttonA.mouseUpBlock = self.buttonB.mouseUpBlock = self.buttonC.mouseUpBlock = self.buttonD.mouseUpBlock = ^{[self stopNote];};}...
We're binding some additional functions to the custom mouse events we defined in our CustomButton class. For the sake of simplicity, we're manually providing the note frequencies as a parameter to startNote for each mouse down event.
Let's take a look at the playNote and stopNote functions:
...-(void)playNote:(float) frequency {generator->frequency = frequency;genVolume = 0.5;NSLog(@"mouse down: %f", frequency);}-(void)stopNote {genVolume = 0;NSLog(@"mouse up");}...
We are simply setting the generator's frequency at the beginning of a playNote command, followed by the intended gain value which we will apply in our next audio processing callback.
Let's turn our attention to the audioProcessingCallback actually producing audio:
...- (bool)audioProcessingCallback:(float *)inputBuffer outputBuffer:(float *)outputBuffer numberOfFrames:(unsigned int)numberOfFrames samplerate:(unsigned int)samplerate hostTime:(unsigned long long int)hostTime {// Ensure the samplerate is in sync on every audio processing callback.generator->samplerate = samplerate;// Generate the tone (full volume).float monoBuffer[numberOfFrames];generator->generate(monoBuffer, numberOfFrames);// Copy the mono buffer into the interleaved stereo output.Superpowered::Interleave(monoBuffer, // left sidemonoBuffer, // right sideoutputBuffer,numberOfFrames);// Apply volume. genPreviousVolume is the start of the volume ramp, and genVolume is the destination of the ramp.// The ramp takes place over the length of the buffer (numberOfFrames).Superpowered::Volume(outputBuffer,outputBuffer,genPreviousVolume,genVolume,numberOfFrames);// Save the latest volume value which is used in the next process loop call.genPreviousVolume = genVolume;return true;}...
End Result
We've created a sandbox for you to experiment with the code above. Click and hold on the A/B/C/D buttons.
If all gone well or you've loaded the guide source code, you should see the following functionality:
You can find the example code for this guide and all the others in both JS and native in one repository over at GitHub.
Download the code examples for all the Superpowered guides in both Native and JS.